Installing Your Interface Card and Software
1. Install your Interface Card
|
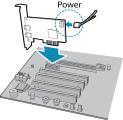
Ensure the card is installed per the manufacturer's instructions. Connect the internal IDE or SATA power connector on the card to the computer power supply. Alternatively, use your PC's built-in host controller, if equipped. |
Open the Windows Device Manager. Ensure the card is properly installed.
2. Install the Spinnaker® Software
Note: For existing users who already have Spinnaker installed, we recommend ensuring you have the latest version for optimal performance of your camera. If you do not need to install Spinnaker, use SpinView to install and enable drivers for your card.
- Go to the Spinnaker SDK page.
- Click the Download button.
- Select your operating system.
- Select your version. You can also read release notes here.
- Python
- Full SDK - downloads all components
- Web Installer - downloads only the installer and then retrieves components based on your selection during install. This version requires an internet connection for the installation.
- Select your version. On the preview page, click Download.
- After download is complete, open the file to start the Spinnaker setup wizard.
- Follow the steps in each setup dialog.
3. Enable jumbo frames on the Ethernet card
- In Start->All Programs-> Spinnaker SDK->SpinView, right click on the Network Adapter and select Adapter Configuration, then select IP Configuration.
- Click Open Network Connections.
- Click Change Settings.
- Click on the Advanced tab and from the Settings list select Jumbo Packet.
- Set the Value to 9014 Bytes and click OK.
_242x41.jpg)